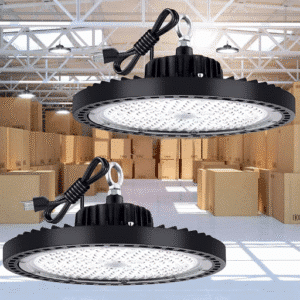
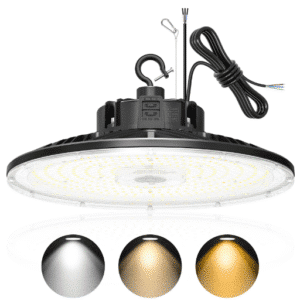
To install an XD5 UFO high bay light, mount the universal bracket to your ceiling structure. Then connect the black (hot), white (neutral), and green (ground) leads, cap the dimming wires if they aren’t used, and add a safety cable as secondary support. Most installation failures happen because installers skip three things: verifying zero voltage, bypassing an old ballast, or attaching a safety cable.
Mike, a commercial electrician in Dallas, learned that last point the hard way. On a 35-foot warehouse ceiling last spring, he hung 24 XD5 fixtures by hook mount. He was ready to call the job done. Then the inspector walked in, looked up, and asked one question: “Where are the safety cables?” Mike spent the next day adding secondary support to every fixture. The job passed, but the delay cost his crew a full shift. The XD5 itself wasn’t the problem. The checklist was.
This guide gives you that checklist. You’ll learn what ships with the XD5, which tools you need, how to install it using hook, pendant, U-bracket, or conduit mounting, how to wire it for standard and 0-10V dimming operation, and how to space fixtures for even coverage. Whether you’re a contractor, a facility manager, or a hands-on owner, the steps below will help you complete a safe, code-compliant XD5 UFO high bay installation.
Key Takeaways
- The XD5 universal mounting bracket supports hook, pendant, U-bracket, and conduit mounting from one hardware set.
- Always bypass or remove existing ballasts on retrofits; line voltage through a ballast will damage the XD5 driver and void the warranty.
- Cap purple (DIM+) and gray or pink (DIM−) leads separately when 0-10V dimming is not used.
- Space XD5 fixtures at 1.0–1.5 times the mounting height; 1.2 is the safest default for most warehouses.
- A safety cable or secondary support is required by NEC and most local codes, not optional.
Need help choosing the right XD5 before you install? Read our complete XD5 UFO high bay light guide to match wattage, beam angle, and voltage to your space.
What Comes in the XD5 Box

The XD5 ships as a complete fixture, not a kit you have to piece together. If you’re still evaluating whether a UFO high bay is the right choice, start with our UFO high bay light guide. Inside the box you’ll find:
- The XD5 UFO high bay fixture with integrated LED driver
- Universal mounting bracket with hook, pendant, U-bracket, and conduit mounting points
- Hook mount hardware and eye-bolt adapter
- Pendant canopy and cord grip for rod or cord suspension
- U-bracket arms for surface or angled mounting
- Conduit entry nipple for threaded rigid conduit
- Wiring leads: black, white, green/bare ground, and 0-10V dimming leads
- Safety cable hardware (carabiner or ring, depending on production run)
Everything is pre-wired at the factory. The driver accepts 100–277 V AC direct wire, so no external ballast, capacitor, or driver box is required. If you’re replacing a metal halide or fluorescent high bay, you must bypass or remove the old ballast before connecting the XD5. Line voltage through a ballast will destroy the driver and void the warranty.
Tools and Materials for XD5 UFO High Bay Installation
Next, gather the tools and access equipment for the job. A proper XD5 high bay installation requires standard electrician tools plus lifting equipment sized to your ceiling height. Don’t try to muscle a 20-pound fixture overhead from a step ladder on a 30-foot ceiling.
| Category | Items |
|---|---|
| Electrical tools | Screwdrivers, wire strippers, lineman’s pliers, voltage tester, torque screwdriver |
| Fasteners | Lag bolts, eye bolts, concrete anchors, beam clamps rated for fixture load |
| Lifting access | Scissor lift, boom lift, or heavy-duty rolling scaffold for ceilings over 15 ft |
| Safety gear | Hard hat, safety glasses, gloves, fall protection, safety cable / aircraft cable |
| Layout aids | Tape measure, laser distance meter, chalk line, layout drawing |
| Optional | 0-10V dimmer or control module if dimming is specified |
Jennifer, a facilities manager in San Diego, planned a 150-fixture retrofit across two warehouses. Before ordering lifts, she printed the lighting layout and marked every mounting point with ceiling height and beam type. Her crew installed the first bay in under two hours because nothing was guessed on site.
Pre-Installation Checklist for XD5 UFO High Bay Lights
Before you start mounting fixtures, run through the prep checklist. Skipping the prep phase is the fastest way to create a callback. Run through this checklist before you touch a fixture.
- Turn off power and verify zero voltage. Lock out and tag out the breaker. Test with a certified voltage tester at the junction box and at every fixture location.
- Confirm the ceiling structure rating. Wood joists, steel beams, and concrete decks all require different fasteners. The mounting point must support at least five times the fixture weight.
- Plan the layout and spacing. Use a Spacing-to-Height Ratio (SHR) of 1.0–1.5. For most spaces, 1.2 gives even coverage without dark spots.
- Check the supply voltage. The standard XD5 operates on 100–277 V AC. If your facility runs 347 V or 480 V, you need a step-down transformer or a voltage-specific model.
- Decide on the ballast bypass. If you’re replacing HID or fluorescent fixtures, remove or bypass the old ballast. Direct wire line, neutral, and ground to the XD5 leads.
- Inspect the driver label and dimming leads. Confirm whether your production run uses gray or pink for DIM−. Both are common, and the label is the final authority.
How to Mount the XD5: 4 Methods

Once the prep is done, choose the mounting method that fits your ceiling structure and application. The XD5 mounting bracket is the same part for all four installation styles. For broader principles that apply to any fixture, see our general high bay lighting installation guide.
Hook Mount
Hook mount is the fastest option for open ceilings with exposed beams or pre-installed hooks. It’s the go-to method for most retrofit warehouses.
- Install an eye bolt or beam clamp rated for the fixture load plus safety margin.
- Attach the XD5 hook mount to the fixture body using the supplied bracket.
- Hang the fixture on the hook and rotate until seated.
- Attach the safety cable to a separate structural point. Never clip it to the same hook as the fixture.
- Adjust hanging height and aim.
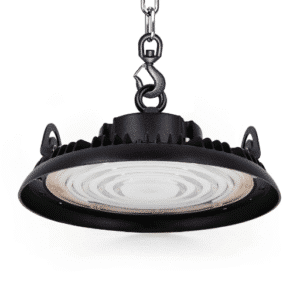
Pendant Rod Mount
Pendant rod mount is best for clean, finished ceilings where the fixture must drop through a canopy.
- Mount the canopy to the junction box.
- Thread the pendant rod or cord through the canopy and attach it to the ceiling structure.
- Route the wiring through the rod or cord.
- Connect the fixture to the bottom of the pendant and tighten the cord grip.
- Secure the safety cable independently.
U-Bracket / Surface Mount
U-bracket mounting works for wall washing, angled ceilings, or lower bays where you want the fixture close to the deck.
- Attach the U-bracket arms to the fixture housing.
- Bolt the bracket base directly to the ceiling or wall surface.
- Adjust the fixture angle for the desired light distribution.
- Route wiring through a junction box or surface raceway.
Conduit Mount
Conduit mount is the cleanest choice for code-compliant hardwired installs in new construction.
- Thread a rigid conduit nipple into the XD5 conduit entry.
- Secure the conduit to the ceiling box.
- Pull line, neutral, ground, and optional dimming conductors through the conduit.
- Connect leads inside the fixture housing and reinstall the cover.
| Mounting Method | Best For | Ceiling Type | Install Speed |
|---|---|---|---|
| Hook mount | Retrofits, exposed beams | Open steel/wood | Fast |
| Pendant rod | Finished ceilings, drops | Drywall, finished deck | Moderate |
| U-bracket | Angled or low ceilings | Wall or sloped surface | Moderate |
| Conduit mount | New construction, code jobs | Any with raceway | Slower |
XD5 Wiring Step-by-Step
With the fixture mounted, the next step is wiring. Wiring the XD5 is straightforward, but the dimming leads cause the most confusion. Use the XD5 wiring diagram / color code table below to land every conductor correctly.
| Wire Color | Function | Connection |
|---|---|---|
| Black | Line / Hot | Junction box hot conductor |
| White | Neutral | Junction box neutral conductor |
| Green or bare | Ground | Grounding conductor / box ground |
| Purple | DIM+ (0-10V) | Positive dimming control |
| Gray or pink | DIM− (0-10V common) | Negative dimming control |
Standard Wiring Without Dimming
- Connect black to black, white to white, and ground to ground.
- Cap the purple DIM+ lead separately with a wire nut.
- Cap the gray or pink DIM− lead separately with a wire nut.
- Do not twist the purple and gray/pink leads together. Doing so can cause erratic behavior or driver damage.
0-10V Dimming Wiring
- Connect line, neutral, and ground as above.
- Run a Class 2 low-voltage pair from the dimmer or control module.
- Connect purple to DIM+ and gray/pink to DIM−.
- Observe polarity. Swapping DIM+ and DIM− will prevent the fixture from dimming.
Tom, a maintenance supervisor in Ohio, once installed a batch of cheap UFO lights without grounding them properly. The drivers failed within a year. When he switched to the XD5, he made sure every green ground lead landed on the box ground and every fixture had a dedicated safety cable. Two years later, zero failures.
Spacing and Beam Angle for XD5

After wiring, the last technical decision is placement. Even the best fixture looks bad if it’s mounted at the wrong height or spaced too far apart. Use the XD5 beam angle and SHR rules below.
Beam Angle Selection
| Beam Angle | Mounting Height | Best Use Case |
|---|---|---|
| 60° (narrow) | 26–40+ ft | High racks, aisles, focused task lighting |
| 90° (medium) | 20–26 ft | General warehouses, workshops |
| 120° (wide) | 13–20 ft | Lower ceilings, open floor plans |
Spacing-to-Height Ratio
SHR is the fixture spacing divided by the mounting height. A 1.2 ratio is the safest default for most industrial spaces.
| Ceiling Height | Typical Fixture Spacing | Wall Offset |
|---|---|---|
| 20 ft | 16–20 ft | 8–10 ft |
| 25 ft | 20–25 ft | 10–12.5 ft |
| 30 ft | 24–30 ft | 12–15 ft |
| 35 ft+ | 28–35 ft | 14–17.5 ft |
If your layout has racking, conveyor lines, or inspection stations, request a photometric study. A study will show actual foot-candle levels and uniformity before you buy or install a single fixture.
Need help with lumen targets? Our guide on how many lumens you need for high bay lighting walks through the math for warehouses, gyms, and factories.
XD5 UFO High Bay Installation Safety Requirements
Industrial lighting is held to a higher standard than residential work. Treat these items as mandatory, not optional.
- Safety cable / secondary support. NEC and most local codes require a secondary means of support for suspended luminaires. The safety cable must attach to a structural member independent of the main mount.
- Qualified installation. While a competent maintenance team can install the XD5, local codes may require a licensed electrician to make final connections. Check your jurisdiction.
- Proper grounding. Always land the green or bare ground lead on the junction box ground. Poor grounding is a leading cause of LED driver failure.
- Warranty protection. Modifying the fixture, using it outside its rated voltage, or leaving a ballast inline will void the XD5 warranty.
Installation Cost and Time Estimates
Cost varies by ceiling height, access difficulty, and whether new wiring is needed.
| Scenario | Labor Time per Fixture | Estimated Cost per Fixture |
|---|---|---|
| Simple retrofit, existing wiring, low ceiling | 0.5–1 hour | 100–100–250 |
| Standard warehouse, lift required | 1–1.5 hours | 250–250–400 |
| Complex job, new conduit, high ceiling | 1.5–2.5 hours | 400–400–600+ |
Commercial electrician rates in 2026 typically range from 75–75–150 per hour. A crew with a lift and a clear layout can often beat these estimates. Poor access, unknown voltage, or ballasts still inline will push them higher.
For a broader cost picture, including fixture pricing and ROI, see our XD5 UFO high bay light price.
Common XD5 UFO High Bay Installation Mistakes

These are the callbacks we see most often. Avoid them and you’ll avoid rework.
- Leaving the ballast inline. This is the number one driver-killer on retrofits. Bypass or remove it.
- Skipping the safety cable. Inspectors notice. More importantly, gravity notices.
- Choosing the wrong beam angle. A 120° optic on a 40-foot ceiling wastes light on the walls. A 60° optic on a 15-foot ceiling creates hot spots.
- Overloading the circuit. Add up the fixture wattage and confirm the breaker and wire size can handle it.
- Tying dimming leads together. Cap purple and gray/pink separately when dimming is not used.
- Ignoring the driver label. Wire colors can vary by production run. The label on the driver is the final word.
Testing and Troubleshooting
Before you leave the site, run a quick power-on sequence.
- Restore power at the breaker.
- Check each fixture for uniform light output and no visible flicker.
- Test 0-10V dimming from minimum to maximum if installed.
- Walk the floor and look for dark spots or glare.
- Confirm safety cables are attached and tight.
If a fixture does not light:
- Verify zero voltage at the box first, then recheck connections.
- Confirm the supply voltage is within 100–277 V AC.
- Make sure the dimming leads are capped separately or connected correctly.
- Check that no ballast remains in the circuit.
FAQ
Do I need an electrician to install the XD5?
Legally, that depends on your local code. Practically, a licensed electrician should make the final line-voltage connections, especially in commercial facilities where permits and inspections are involved.
How high should XD5 fixtures be mounted?
Match the beam angle to the height. Use 120° for 13–20 ft, 90° for 20–26 ft, and 60° for 26 ft and above.
Can I install XD5 on a sloped ceiling?
Yes. Use the U-bracket mount and angle the fixture so the light points straight down or follows the work plane.
How many XD5 fixtures do I need?
Calculate based on ceiling height, room dimensions, and target foot-candles. Start with SHR 1.2, then refine with a photometric study if the project is large or light-critical.
What conduit size should I use for XD5?
Most single-fixture runs use 1/2-inch or 3/4-inch rigid conduit. Larger conduit may be needed if you are pulling multiple dimming or power circuits through the same raceway.
Can I use XD5 with a 347 V or 480 V service?
No, not without a step-down transformer. The standard XD5 accepts 100–277 V AC. Order a voltage-specific model or add a transformer for higher services.
Conclusion
A successful XD5 UFO high bay installation comes down to preparation. The right mounting method, clean wiring, correct beam angle, safe spacing, and a safety cable on every suspended fixture matter more than the fixture alone. Most failures aren’t caused by the XD5. They’re caused by skipped steps.
Use this guide as your installer’s checklist for XD5 UFO high bay installation. Confirm voltage, bypass old ballasts, and cap dimming leads properly. Add secondary support. When the layout is planned before the lift rolls in, the job moves faster and passes inspection the first time.
Ready to get started? Review our complete XD5 UFO high bay light guide to choose the right wattage and beam angle, or see how the XD5 compares to other UFO high bays before you decide.